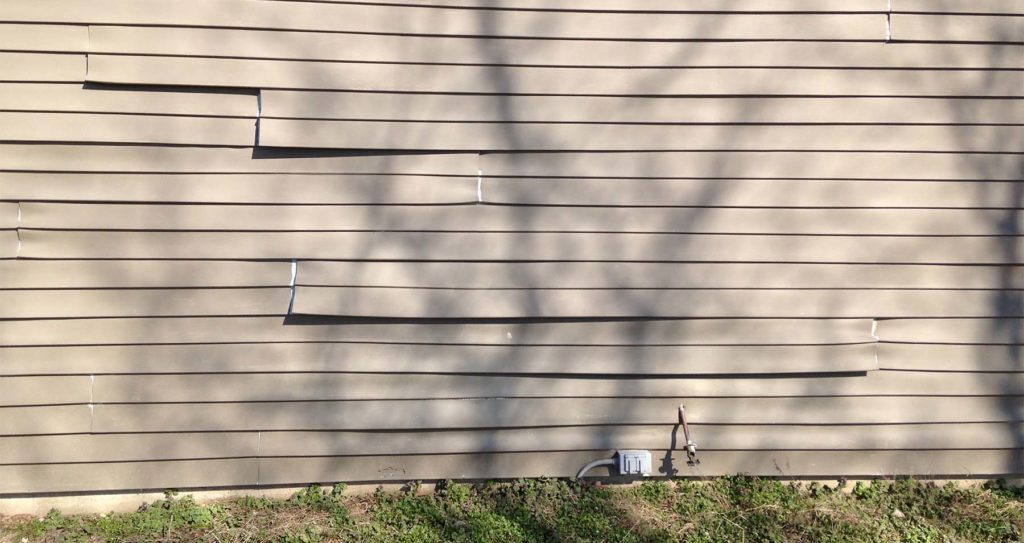
What Is Under Your Current Siding?
When choosing to take on the siding installation by yourself, you need to have a working knowledge of siding systems – for example, do you understand how to identify mold, water or pest damage on your home and repair it? That old siding is ugly but that is only what you can see. What could be going on beneath the surface? Expert eyes with years of experience can spot things in an instant that a novice may not notice. The carpentry work for any of the problems is required before the siding is installed. If you cover up the problem , you will have a huge expensive problem later.
Do You Have The Tools?
So you have found a reputable vinyl siding manufacturer, picked a color, and paid for it and had it delivered. You are ready to start your DIY project. What now?? It is like a gigantic puzzle and all the pieces are sitting in neat and tidy bundles. You will need the following tools…
- Hammer – Just your average run-of-the-mill framing or claw hammer.
- Square – You want to make sure your angles are true!
- Chalk Line – It’s the best way to mark a straight line .
- Level – It is extremely important to perform constant level checks.
- Tape Measure – Measure twice, cut once!
- Fine-Tooth Hand Saw – The saw blade must have fine teeth.
- Power Saw – A bench or radial-arm saw can speed the cutting necessary to complete your project.
- Utility Knife or Scoring Tool – A utility knife or scoring tool can be used to trim and score the material.
- Electric Drill & 5/16 Drill Bit – You need to drill 5/16 holes every 24 inches to allow for proper water drainage.
- Tin Snips – Good quality tin snips will speed the cutting and shaping of the vinyl.
- Snap Lock Punch – To be used to punch lugs or holes in the cut edges of siding for the finishing course at the top of a wall, or under a window.
- Nail Hole Slot Punch – To elongate a nail hem slot. The hole is elongated to allow for expansion and contraction.
- Unlocking Tool – The unlocking tool allows for the removal or replacement of a siding panel without the risk of damaging the material.
- Fastener Choices – It is important that all fasteners be able to penetrate no less than 3/4” into framing or furring.
- Staples – If staples are being used instead of nails or screws, they must be no less than 16 gauge penetrate no less than 3/4” into the framing.
- Glasses – The proper protective equipment is always recommended.
- Siding Brake Tool – This would be a rental item. It bends metal to conform to the shape of your trim.
Do You Have The Experience?
Hiring professionals eliminates problems. Professionals have more extensive warranty coverage – If you’re installing your siding DIY, your warranties would likely extend to just the materials. When you hire professionals, there will be no heavy lifting, no dangerous tools to handle, and they will finish faster than you can. Also you must consider city rules and regulations. You may need a permit and a professional will know the regulations for your area. Professionals will be able to give advice about what kind of insulation you need to install. They will also know that vinyl siding shifts, which makes fastening it best left to professionals so you don’t end up with buckles or waves in your siding.
Do You Have the Time?
This is not a typical home improvement project that you can check off your to-do list in one weekend. You will need several days and additional help for this project. So consider your time required and additional labor to complete the job. So ask yourself how much time you really want the installation to take and then honestly how long it will take you to do it in between work, family, walking the dog, and even setting aside an hour or two to sleep or watch a ball game. A professional team with a full crew of experienced team members can take up to a week to complete the job to your specifications. With little knowledge or experience, you can end up paying more for mistakes, or hit a wall and end up hiring a professional anyway.
What Will You Do With the Trash?
Just remember the old siding must come off and go somewhere before the new can be put on. Usually the youtube video or the TV renovation program never talks about the elimination of all that material. Enter debris removal services. You will probably need to rent a dumpster. And then you will have to find a dump who will accept the debris. Both of these services will charge a fee. Professionals have the necessary equipment to scan and scour the surrounding of your home ensuring that any stray scraps and sharp nails will get picked up properly, rather than landing in a person’s hand or a pet’s foot. There is so much to consider when facing a project of this size. So before you consider this to be a DIY project it may be wise to call a professional for a bid and some answers to your questions.
Creativity makes all the difference in remodeling your home! Becraft Plus has vast experience creating new additions for customers.
Contact Us (301-929-3401) For a Free Consultation!
—
 About Becraft Plus
Since 1989, Becraft Plus has provided customized design and construction services to customers in the Washington, D.C. area. We specialize in custom home building, additions and remodeling, and whole house renovations with a focus on creating living spaces that are tailored to the needs of our clients.
>> Learn More


 About Becraft Plus